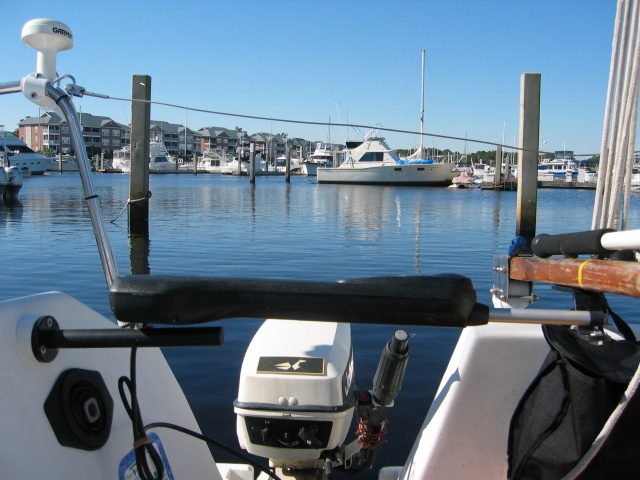
Here are some images of it installed on starboard.
The white material that I used to shim the mount with is 1″ thick starboard. I used a hole saw to drill out a round plug and then used a belt sander to put the correct angle on it to get the cantaliver mount to come straight out and line up both forward/aft and up/down with the bracket on the tiller itself. It is a compound angle you have to adjust for. so you get the one angle on the face of the shim and then I rotated the shim to get the other angle right. Then used a pair of vise grips to hold the base for the cantiliver bracket to the shim and drilled the holes. of the three bolts that come with the cantilever bracket two will be two short so you need to get longer ones.. I would get all three replaced so that they all match for threads. The cantaliver bracket comes with at backing plate. You are going to have to wallow out the holes on it so that it will lay flat on the back of the seat back inside the cockpit locker at an angle. I used stainless locking nuts on the bolts rather than mess with washers.
I could not get the 30mm tiller bracket so ended up using the 60mm tiller bracket. it drops down 2 inches instead of one inch. If doing it over again I think I would go this route again. It leaves plenty of room for you to get the end of the tiller over the pin and fix it in place or to get it off the tiller quickly if needed. Also if you raise it up one inch it will require the cantilever bracket to be mounted higher up on the sea back and that will require a thicker shim to fill in the distance the seat back recedes at that height.
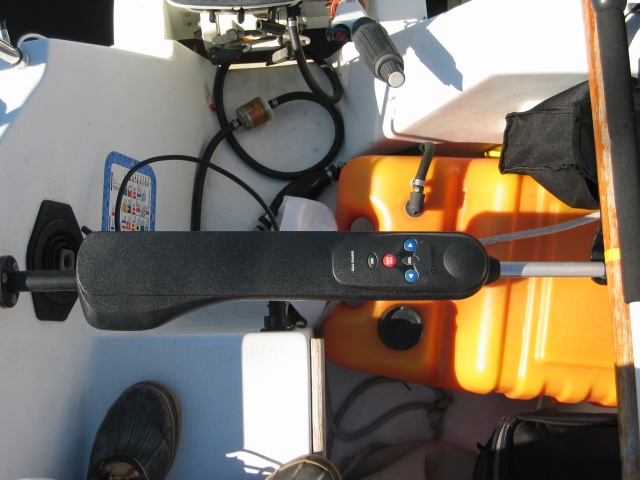
and here are where I mounted the simrad bus spliter and the remote for the autopilot.
The simrad bus is in the head compartment and the remote is just to starboard of the companionway ladder in the intrance to the aft cabin. All the wires come together behind the bulkhead over the chart table from the cockpit and from the remote etc.. the gps wires meet there also. Having the inspection port installed in that bulkhead has made working in there much much easier for pulling wires through or connecting them up in there.
A note about the remote control.. they don’t say in the instructions but it comes with a red ended simrad cable that has a bare black and bare red wires coming out the other end. These go to 12vground and 12v+dc respectively and plug into one of the simrad splitter sockets. This provides power to the simrad bus to power the remote unit when you plug it into the splitter. The third port on the splitter is where the simrad cable from the autopilot itself plugs in.
Notes on my experiences with it so far.
I have not used it down wind yet so I still have that to learn about. But it is awesome for tacking (the one i have has twice the speed lock to lock of the lower models which makes it nice) . It also does a great job in 23 or 24 knots of wind going to windward in 2 to 5 ft seas. However you have to balance the boat. It will work its little heart out and not do much good if the boat rounds up because it is not balanced. so when running it you reef early and really pay attention to sail trim. Every once in a while I would look back at it and it would be holding the tiller all the way over to compensate for the pressure to round up and I would trim the sails to balance her. Having got the tp32 which is made for much bigger boats than mine it wasn’t struggling at all. I could hold the tiller with no problem against any pressure. It’s just up to you to trim the sails right so that it doesnt have to. The remote is a killer feature I now understand why everyone that has had one would not go back to one without. the ability to sit up on the fordeck in calmer waters under power and steer from there is really nice. GPS integration looks like it is going to be very usefull as long as my course is at least 55 degrees from the wind. I would like to be able to get a wind instrement that it could use.. the sail to wind feature would be very nice. the simrad unit seems to just sip power. friday it wasn’t challanged at all as we were in flat water under power. Sunday on the way back it was windward all day in 2 to 5 ft seas with 20+ knots of wind and it definately ate more power than on friday but not that much at all. The tiller pilot doesn’t take into account leeway unless your in nav mode and it is following the GPS’s instructions.. on its own it will follow a compass heading but it doesn’t know or care if it is falling down due to current or wind. So you need to watch it carefully if your in tight quarters such as the waterway.
Sailing with it and reefing early taught me some things. I was still doing 6 knots a lot of the time with two reefs in and about 110 % of the jib out. I think the winds were in the low 20’s. You can still go quite fast but more comfortably if you take in a lot of sail. I had been pushing it with one reef and full jib but was tired because we had been out for about 10 hours at that point with two of us on the rail almost the entire time. It got dark and colder and we would get a spash every now and then. We finaly moved to the cockpit up against the cabin to get out of the spray and slowed her down (reefed her in some more) she really didn’t lose much speed. Tell you what though.. going to windward for 9 or 10 hours in 20+ gets tiring. Even with an autopilot. We were tweeking sails most of the day to get the last little bit of performance out of her so we stayed busy. Dock to dock was about 12 hours.
Here are some observations on my second day on the ocean with it.
I tried out the GPS integration and it was not very successfull. The autopilot did take data from the Garmin and entered NAV mode and it seemed to be trying to follow the route to the waypoint. However it would consistently go to starboard of the track till i was a couple hundred feet to leeward of the track and then the autopilot would alarm and disengage. (the manual says that it will do this if it gets to far from the course it is supposed to follow. It is supposed to compensate for cross track error. I think the problem is in the calibration of the onboard compass in the autopilot. I need to try and calibrate it again. My thought is that it and the GPS are about 7 or 8 degrees different from each other.. I think… though why it would be using the internal compass when reading GPS information in NAV mode I don’t know. I will give simrad a call and talk to them about it.
My second day on the ocean with it I tried out the GPS integration and it was not very successfull. The autopilot did take data from the Garmin and seemed to be trying to follow the route to the waypoint. However it would consistently go to starboard of the track till i was a couple hundred feet to leeward of the track and then the autopilot would alarm and disengage. I think the problem is in the calibration of the onboard compass in the autopilot. I need to try and calibrate it again. My thought is that it and the gqs are about 7 or 8 degrees different from each other.. I think… though why it would be using the internal compass when reading gps information in NAV mode I don’t know.
here are some replys I made to questions on the beneteau235.com website forums about the auto pilot installation
The post unscrews when not in use.. 🙂 The posts mounting unit also has a nice backing plate the size of the mount itself. I can grab the end of the post and put a decent amount of pressure on it and there is not any give or wobble.. It feels rock solid. not sure I would want to hit it with my whole body weight instantly but I would be willing to bet money that it would take a lot to have it give. Normal operation does not produce any side to side torque on it if it is installed correctly. If you fell on the auto pilot with your whole weight I would expect the autopilot itself to give before the mount and post did.
The mount, post and auto pilot do not interfere with the pump. you can sit next to the auto pilot and let your left hand reach over it and pump with it in place while sitting normally. The pump on sea puppy operates on the down stroke from horizontal and it never comes up above horizontal so all motion is under the level of the autopilot.
as to the GPS NMEA signal.. it doesn’t run through the simrad simnet system as the garmin isn’t simrad compatable. The autopilot has two wires extra that come off of if for integrating into non simrad gps units that are NMEA 183 compatable. I just connected the NMEA + wire to the garmin NMEA out wire provided with the standard wiring harness on the Garmin and the NMEA – (common) on the autopilot to the 12v ground wire on the garmin harness. Just I used awg 14 or 16 tinned wire to go from the auto pilot wires to where the garmin harness terminates behind the bulkhead over the chart table.
I recently got a question about mounting my TP32 autopilot on sea puppy and here is my reply to it.
He had asked about the width and slant on the shim I made to get the cantilever arm horizontal when mounted.
I can certainly do that for you if you want but mine is not quite perfect. I can tell you that the widest is between 3/4 and 1 inch thick.. probably closer to 1″ and the thinest is 0″ inches. I will measure it Friday when I get back to the boat and can send it to you the beginning of the week when I’m back off the water. 🙂
I sanded it down to a wedge and it was slightly rotated. Here are a couple pictures that you can see close up on it.
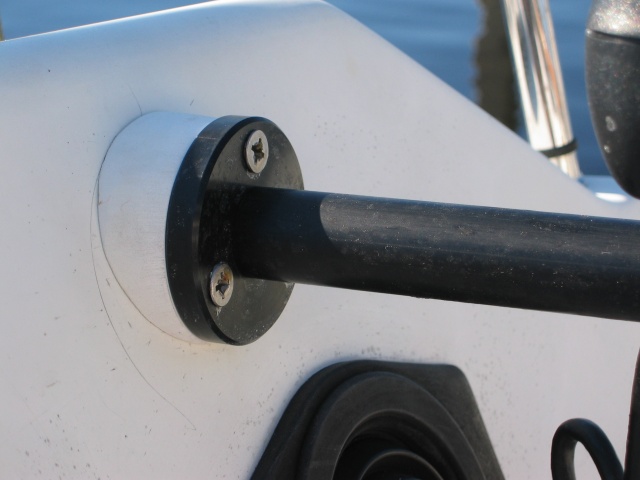
I used Starboard and cut out circular plugs 6 or 4 inches in diameter using a hole saw attachment in a drill press. A jig saw could do as well. It is tough stuff to drill the plugs out of. Take the mount base for the cantilever arm and just make sure you get the plug bigger than it.
I remember that its thickness wasn’t quite enough to get the correct slope for the arm to be horizontal till I started rotating the plug. mine is still just slightly off but it doesn’t affect performance. I used a belt sander at the dock to do this. I would work it a little and then check the fit on the boat. then go back and do it again. The belt sander was really easy to use. I just turned it upside down on the dock and held the piece to it. I had made 4 plugs and ended up throwing the first one away when I took off to much material.
I would advise not drilling any holes till you have the shim/plug made and have held everything in place to ensure levelness from the cantilever mount to the under tiller mount. The cantilever mount base has to be oriented/rotated exactly so that when you screw in the cantilever arm the holes that the tiller pilot mount in are oriented straight up with the arm fully screwed into the base.
Once you get the shim right, then with the arm in the base take and use the holes in the base as your drill guides to drill the holes in the base. I marked the holes with a pencil and then took the arm off. Then used a pair of vise grips to put the base back on the shim where it was marked and then drilled the holes. After that you do the same thing using the base and the shim/plug to act as a guide to drill thought the seat back there. The drilling I found to be the most critical part as you are trying to drill in place through a slanting surface (The shim and the cockpit wall). I would advise once you have drilled the holes in the shim that you double check the fore and aft and up and down alignment of the cantilever arm with the tiller pilot in place. This will allow you to see if you are truly aligned between the cockpit wall and the attachment point on the tiller. Once you start drilling in the boat your options become much more limited :). I also would advise drilling one hole in the boat and then bolting it in place and checking alignment at this point. You can still make a new shim at this point if stuff isn’t lined up right and try again. The cockpit wall slopes in two different directions. It slopes to starboard and aft and it slopes in to the center of the boat from above.
Once I had all holes drilled and was ready to mount it, I took and drew a pencil line around the cantilever base onto the starboard. Then freehand on the belt sander, I sanded down the excess material around the edges to make it look like a smoother transition between the mount base and the shim.
Unless you build two shims (one for inside of the cockpit locker) your nuts and washers on the backsides of the bolts will pull into the back of the seat inside the cockpit locker at an angle. I didn’t use a second shim just some big stainless washers on the back side and tightened the hell out of it. It has worked well and I have not had any give in the arrangement. It is very solid. I also didn’t use the bolts shipped with the mount but went and bought some longer stainless ones with locknut’s so I didn’t need to mess with lock washers. I don’t think the stock bolts were long enough through the thickest side of the shim if I remember correctly. I used a wrench to tighten the nuts from the backside while using a screwdriver to hold the bolts steady from the cockpit. As you can see in some of my pictures I tried using the screwdriver to tighten them at first and started to strip out the heads. I would only tighten from the nut side if doing it again.
[quote=”jhume”]Thanks Scott for the big reply to my autopilot installation. I appreciate the detail. You’ve made some worthwhile points in your writeup that I will use in putting my system together. I think I’ll make a practise plug first to rough set the whole thing together, including holes. I’ve got a plank of teak about 1 1/4″ thick that I’m going to use for the final plug material, which I think is going to look really good when finished. Perhaps the extra thickness may actually provide a very level installation for the autopilot.
It sounds from your write up that a wedge ~1 1/4″ at the thickest and ~0″ at the thinnest will give me a good mount. Then I would just have to rotate to get right compound angle adjustment. I think this will be my starting point for a practise plug and see where I get with that.
I’ll keep you informed with my process. Unfortunately, I don’t have power at the dock, so the process my be a little tedious back and forth.
Thanks again.
John[/quote]
that extra 1/4 inch should make it a lot easier for you.. It gives you little extra fudge room.
Having power at the dock is/was awesome for getting it done quickly.. if you can grab a small 1000 watt generator from someone it would be worth while for doing the custom trial and error install.
forgot to mention.. make sure you can use the manual bilge pump with the autopilot in place. Mine is just between the seat and bilge pump. sitting on the seat beside the autopilot your left hand can fall over the aft side of the autopilot and reach and pump the bilge pump handle.
here you can see the mount up and to the left of the bilge handle.
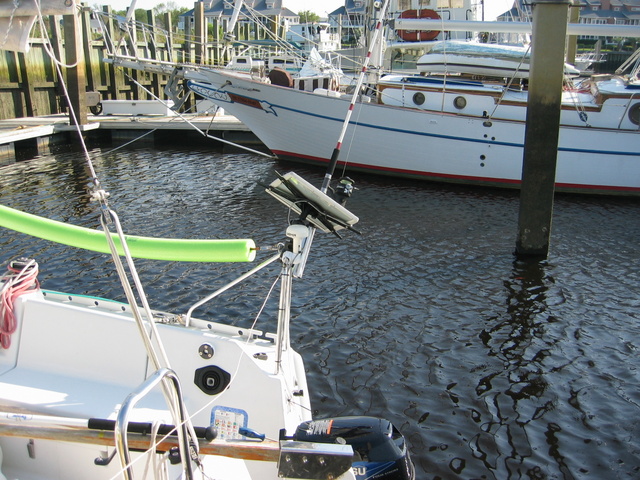
side view
overhead view
Recent Comments