Well I finally got the keel cable fixed on “Goes Around Comes
Around” my Santana 21. It was a bugger! Very stupid design. You have to
take the keel off the boat toput a new cable on. you could put a
new one on if the old one was still there I guess but mine snapped
about 8 inches from where it attaches to the swing part of the keel.The keel is cast iron and weighs in at 550 lbs so it isn’t
something that you just throw around. I took the boat to the Prop Shop
over in Little River and with the help of Richard and (Larry the owner)
we put it on the boat lift and lifted the boat off of the keel. Leaving
the keel on the trailer so we could then move it from under the boat to
work on it. In the below picture you can see it after we pulled the
trailer out from uder the boat and she is hanging in air before we put
supports under her.
This was not non trivial. if you will look at the picture
here
you can see 2 of the 3 bolts that are accessable in the little
companionway. The cordless drill hides the third. The other three were
back up under the seat and
area just forward of the port bulkhead and you could not get enough
leverage to break the nuts free from the bolts. This photo shows thefirst two of these bolts from aft thru the storage under the seat that faces aft on the port side.
Richard has a
compressor on his van and we used an air gun to remove the nuts after
drilling 1 inch holes down thru the fiberglass over the bolts on the
port side. This allowed a half inch extension to reach down thru the
holes to the nuts. A 30mm socket fit and I think richard used a 1 1/4
inch socket also that fit a little snugger. I will get some one
inch plugs to put in the holes later.
This worked like a charm. The only problem we ran into was that after
we got the nuts off we had to put them back on the bolts a few turns so
that we could use a small sledge hammer to knock the bolts down thru
the keel. The bolts are about a half inch in diameter with a cone
shaped shoulder flat screw head on them. They go thru the keel into the
boat from the bottom and recess in holes in the keel. The last time this was
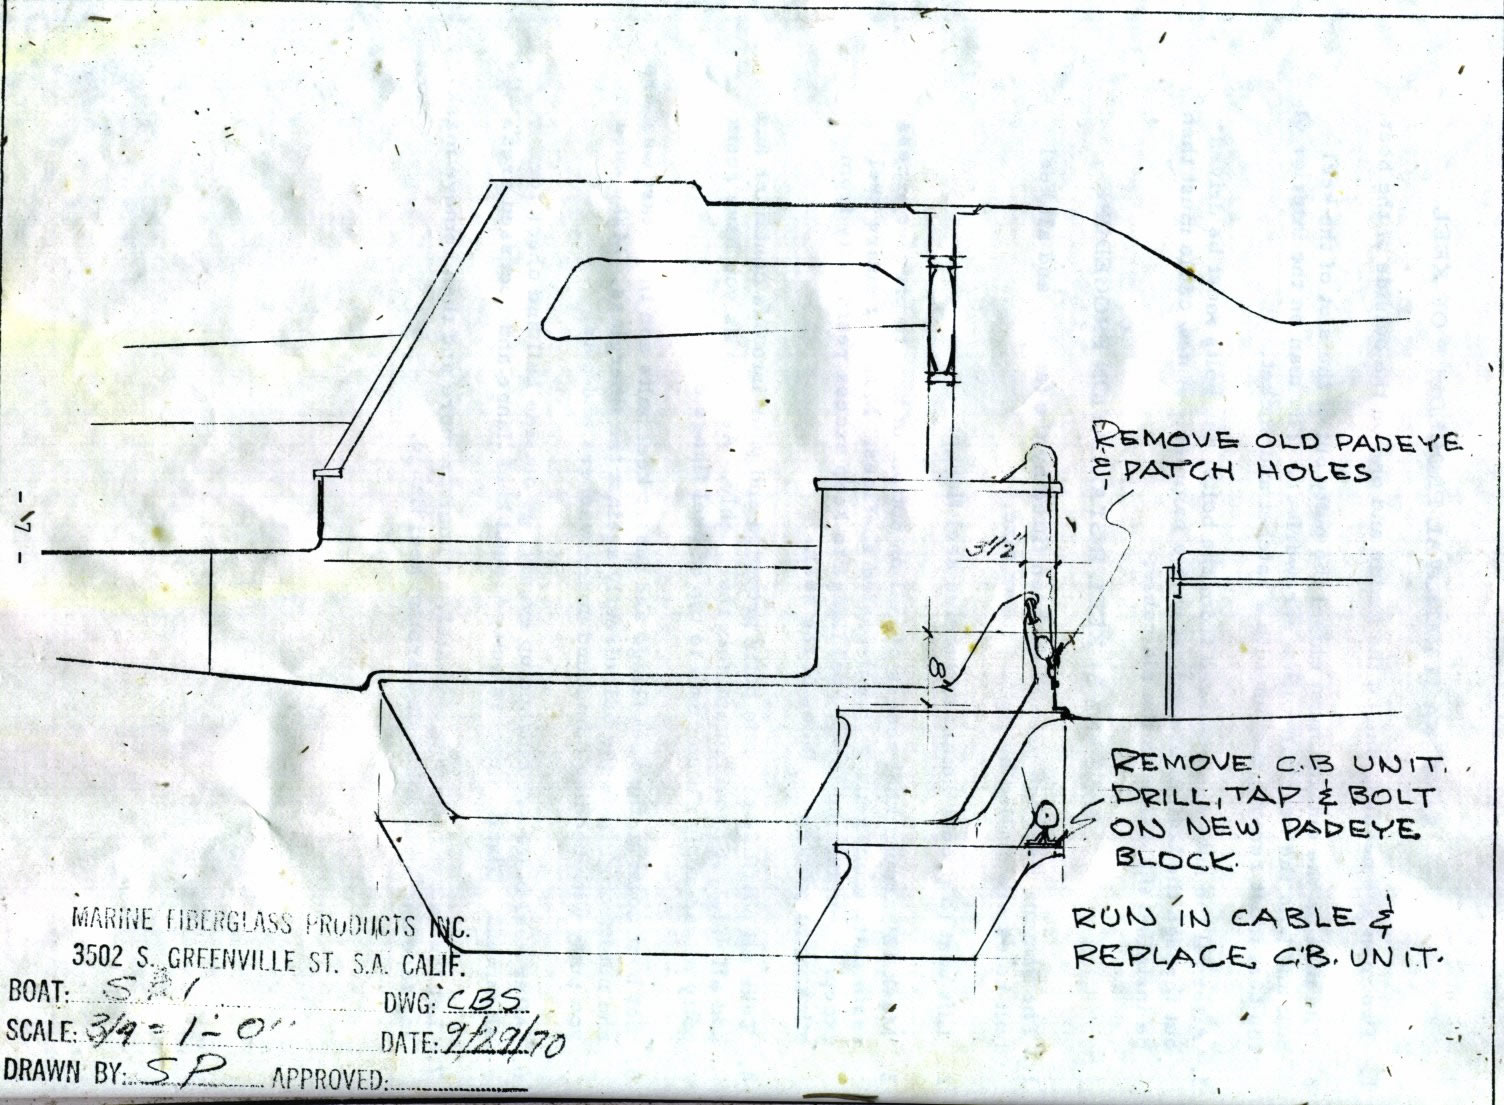
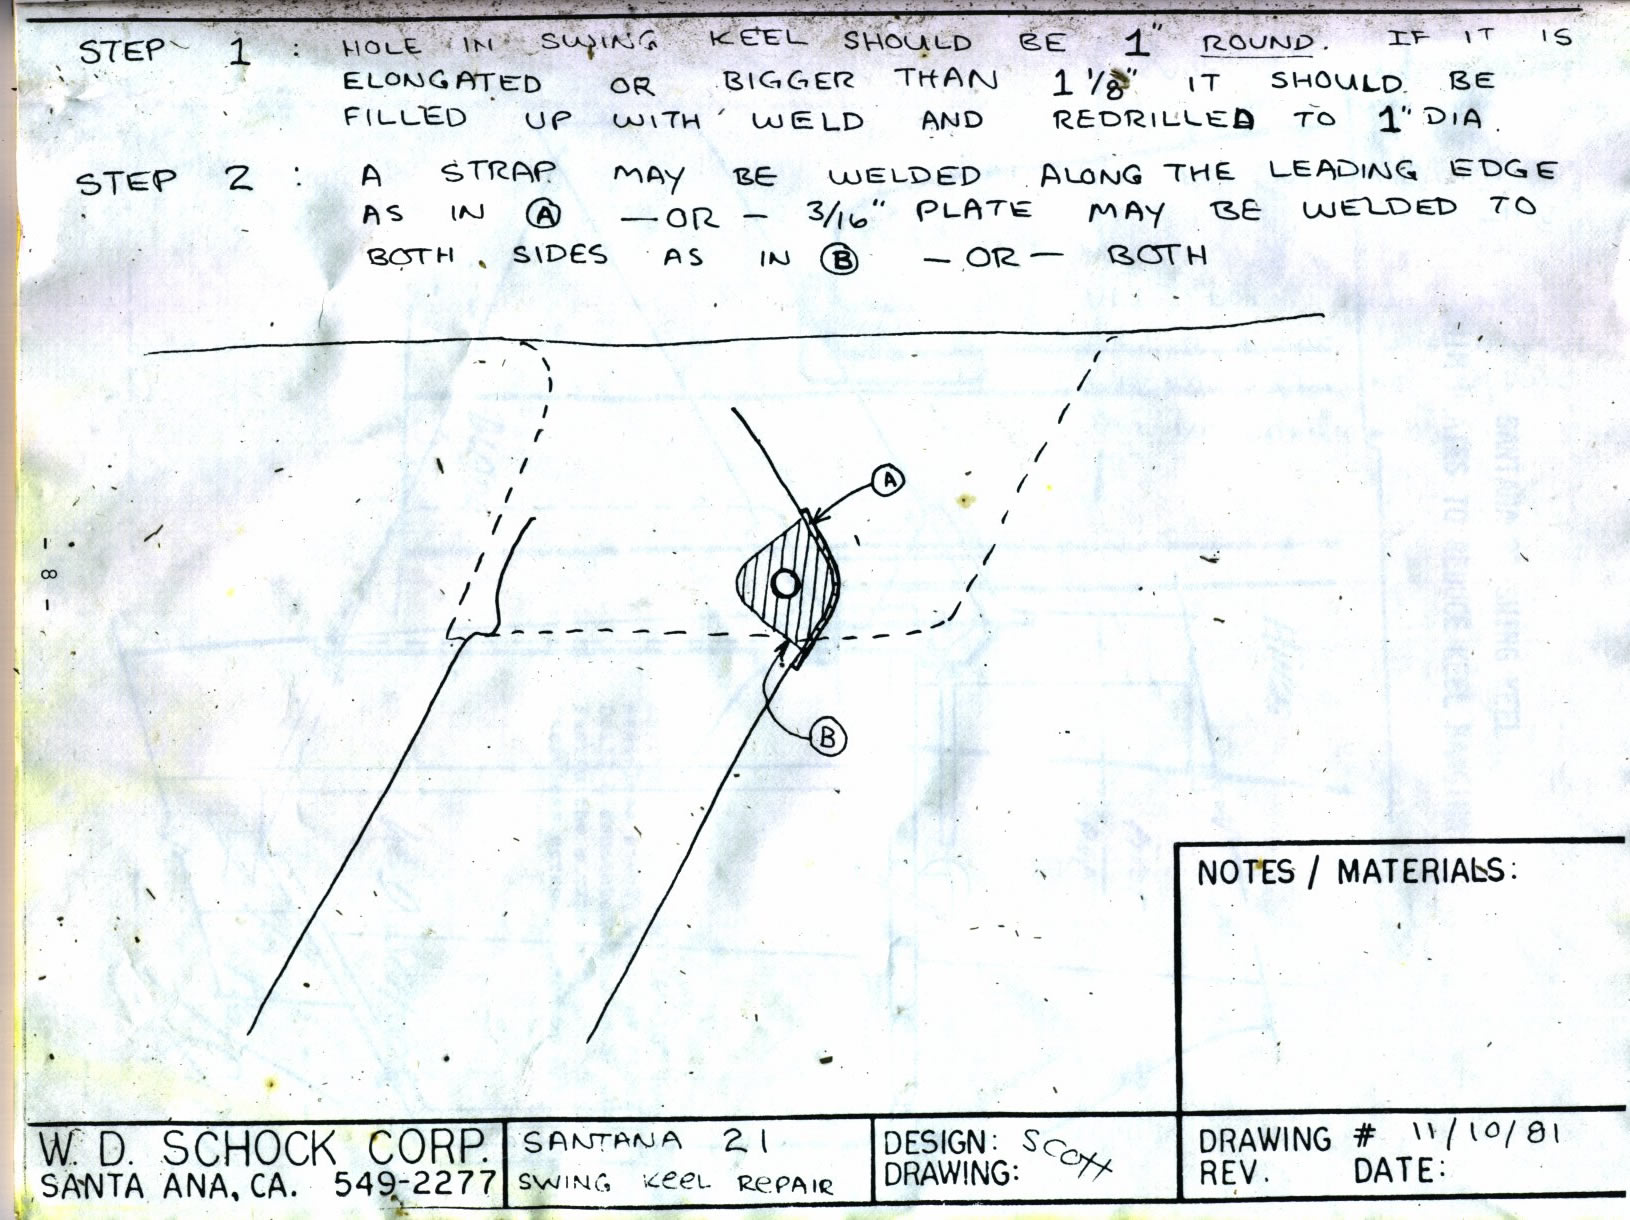
done they used lots of epoxy to bed the the keel in and it had totally surronded the bolts holding them in. It tooks some serious banging with the sledge hammer to get them out. In the process one bolt and nut were stripped. We didn’t get the nut far enough back on the bolt before hitting it. We later used a tap and die to fix the threads on the bolt and nut so that we could put it back together.Here are some diagrams of the keel setup.
full manual in pdf format for santana 21
We wheeled the trailer over to the shop and larry used his chain
hoist to pick the keel off the trailer so we could work on it.There was a lot of rust on the keel so we took and ground it down
with angle grinders and some very heavy duty wire wheels (You can get
them at home depot for about 15 dollars apiece) I have used the living
daylights out of the wheel I got grinding on the keel and on some
places that had rust on the trailer and it is increadably tough. It’s barely shows any wear. A good
buy even at 15 dollars.After grinding the keel down Larry treated it with OSPHO which is
a acid based rust converter and we left it overnight. The next morning
I put the first of two coats of InterProtect
2000E/1E Barrier Coat System from west marine. After the first coat it
sat over night and then I put the second coat on it the next morning.
This stuff rocks. Its a two part epoxy paint and goes on very thick.
You mix it together and let it sit for 20 minutes before painting with
it. I think it cost me about 34 dollars for the 1 quart kit that I got.
I used about 2/3 rds of it in two heavy coats on the keel. After the
second coat was one we put the keel back on the trailer and wheeled
back out near the boat and left it over night.After
helping Richard put up a mast on the Sailboat Anago the next morning,
he went with me and we put the keel back on Comes Around, Goes Around.
first we had to chip away all the old epoxy from the where the
keel bolts to the hull. hammer and chisel would pop it off but then i
found that the 5 inch angle grinder with a sanding disk on it would eat
the epoxy right off. You just had to be carefull to not go to fast and
eat into the hull. 🙂 I was carefull@! I also used saftey goggles and a
resperator. (used the resperator when painting also) We used 3M 5200 to
bed the keel. This only took one tube. West marine sells this for
16 dollars a 10oz tube. Go to Home Depot and you can get it for just
under 10 dollars a 10oz tube. Once the boat was carefully lowered
over the keel richard went inside the boat with the airgun and I
crawled under the trailer so I could put the bolts up thru the keel and
hull. The bolts were also bedded with 3M 5200. Once the bolt was tapped
up into place I would hold it in place with a big screwdriver while
richard tightend with the air gun. You know its working good when
excess 5200 starts to squeeze out around the bolt and then the keel
where it is being drawn against the boat.lol I almost forgot… we did put a new
Harken 308 BLK-2 IN. WIRE BLOCK
on
the keel… the old block had basically exploded and was why the
keel cable broke. When we took the keel off the boat pieces of the old
block just fell out. Luckily I had planned on replacing the block
anyway and had ordered a new one before hand. West marine had them
online for 52 dollars or so but I found the one I got for 40 dollars at
marine.com. The specs for it are
- Description Single
- Sheave dia. (in) 2
- Weight (oz) 5 1/4
- Max. wire dia. (in) 3/16
- Max. line dia. (in) 1/4
- Shackle pin dia. (in) 5/16
- SWL (lb) 2000
- Breaking strength (lb) 4000
We also got a new length of stainless 3/16 cable made up at west
marine to go on the keel and installed all this just before putting
keel back on.Everything went well and Goes Around, Comes Around
is back on the trailer in the yard here. I still have to get a little
epoxy and filler to fair in the crack between the keel and boat and to
fill in over the top of the keel bolts where the are recessed into the
keel on the bottom.Total time
- thursday .. taking keel off of boat with richard
- friday… larry and me grinding it down and larry treating it with ospho also helped richard with mast for anago this day
- saturday…first coat of paint .. also ground some rust back on trailer
- sunday… second coat of paint on keel and painted ground areas
on trailer with leftover paint. put keel back out on trailer by boat.- Monday.. helped richard put mast on anago with Orrin and then
put keel back on Goes Around, Comes Around with richard. Took boat back
to pattys and home on tuesdayTotal Money around 444.00
- Using the lift at Prop shop and larry’s help… 120.00
- Richards help for 4 hours taking keel off and then putting back on 180.00
- 32 for paint and about 15.00 for brushes rollers and trays
- 2 tubes of 3m 5200 20.00
- Harken block and shipping and handling 52.00
- cable from west marine swagged.. 10.00
- Wire wheel for angle grinder 15.00
I spent probably 100 dollars or more on some tools and on some
supplies that I did not end up using. This ended up being a lot more
expensive than I had anticipated. However I put myself in the situation
of having it on someone elses lift taken apart. At this point you do
whatever is needed to fix it.Things I would do differently if I had it to do over again.
Build my own lift in my yard. ( I will be doing this anyway now) All it would take is 4 4x6s 16 or 20 ft long.
I had many of the supplies and tools that I purchased already. But
because I needed a lift for the boat that was 45 minutes away from here
it was easier to just get stuff again. Rather than spend 2 hours round
trip time coming home and finding it here. Between not needing the lift
and the extra I spent on supplies I already had I figure I would have
saved about 160 dollars and 2 days time.This would also have
took the pressure off to get the boat done now now now to get it off of
the lift at the prop shop. We had initially planned on it going on
thursday afternoon and being done and put back on… due to the massive
amount of rust and the grinding and painting this extended the time by
several days. Also Larry was house hunting thru this time and I only
had access to the shop when he was there while my keel was hanging from
the lift inside. This added two days to the time it took to get done.
Larry was nice and charged me a very reasonable amount for lift time
and his labor in helping on the keel. But I felt bad having to call him
saturday and sunday trying to get access to the keel in his shop to do
the painting and such while he needed to be elsewhere looking for a
place to live.Things I would do the same…
It was
definately worth while to get richard to help me. Though I could have
muddled thru it on my own his experience and tools made the job much
easier and faster as well as providing a saftey net when working on the
boat while it was on the lift. This is always a good two person
time…. so at least one can call for help if something goes wrong.I
would definately recomend anyone that needs help with their boat to
give richard a call. You can contact me and I will give you his number
🙂 lol don’t know if he wants it on the internet or not.Also if
your boat is on a trailer and you need a lift to work on it the Prop
shop in little river is the place to go. They also do business as
Barnecal Boulters http://www.boatpropeller.com/
you won’t meet a nicer people.full manual in pdf format for santana 21


I found your blog to be pretty interesting. I just bought a Santana 21 for $300. The keel is still connect with the wench but seems to be broken. Only goes up, not down. I want to avoid the trouble and cost you went through. Any ideas?
-Al
If you have the boat on the trailor so that the keel is up and there is no pressure on the winch then take it apart and replace it with a new one.. You should be able to replace it with heavy duty trailer winch for a boat trailor. The one my boat is actaully probably comparable to a lighter duty one but it has also deformed slightly so i consider it to be to light.. mabye one of the models that have the gears on both sides and is designed for 1500 to 2000 lbs. Just don’t lose the cable down into the keel case.
If you have to replace the cable then I’m afraid that you will have to drop the keel. You should replace the block on the keel at the same time if you do that.
Hello Scott;
I have a santana and my winch cable is starting to fray. I am nervous that this will break. I am thinking, but not sure if it would be possible, to cut into the trunk and put in an access port to replace the cable and for inspection in the future.
Let me know what you think. Kurt
Kurt,
Actually this is possible… but it will be delicate.. the inspection port needs to be high up and to the rear of the keel box so that when the keel is in the down position you can access where the cable attaches to the arm on the top of the swing part of the keel. There is not a lot of room in there but if you are able to detach the cable and tie a line to it, you could then pull the old cable out and still have the line running through the pulley at the bottom of the keel box and up out the slot in front of the winch… make shure the other end still comes out of the inspection port.. then measure your cable and get a new one cut and tie/tape securely to the line and pull it through.. then connect it to the top of the swing part of the keel.
You can see a picture of the inspection port on mine here http://scottcarle.com/gallery/v/Sailingandboats/santanasailboat/img_2677.jpg.html
Kurts reply to me via email and my reply back to him.
Hello Scott;
Thanks for the reply. I was thinking that was the way to do it. Off the top of your head are there any diagrams of the keel cable route. The trunk is so small I cannot see with a flash light.
Thanks Kurt
Kurt I do have some pages that show diagrams from shock. I have linked them in to the original post on my website
http://www.scottcarle.com/wordpress/?p=51
Let me know if they help.
scott
I did the cable replacement on my Santana 21 about 30 years ago by going through the trunk. I cut a large circle–seems like about a foot in diameter–in the middle of the trunk just below the winch. There was no inspection port on mine. I found it quite feasible to detach the old cable and attach the new one–as I recall while the boat was on the trailer. The only problem was my concern that the large hole would leave the trunk too weak to bear the winch loads and support the compression from the mast through the post. So after replacing the cut out circle, I reinforced the whole side of the keel trunk with a 3/8 sheet of marine plywood fiberglassed into place from the hull below to jam up against the floor for the winch. The whole thing was very strong and is still in place 30 years later.
I am now in the process of re-commissioning the boat after about 20 years out of service. As soon as I get it in the water, I’ll let you know how the keel functions. Needless to say, I am very interested in following your experience. MH
Malcom,
It would work doing what you did. I would be very concerned for strength also. How long did you sail her and what was the roughest conditions after you did the modification? Also if you would like to write up what you did and send some pictures of it I would be glad to post them on the website so others can see what you did.
Subject: Re: Santana 21
To: “Scott Carle”
Scott,
I sailed my Santana 21 “Paloma” for about 15 years on western lakes, mostly Elephant Butte Reservoir on the Rio Grande in the middle of NM, but once crossed the Sea of Cortez (Gulf of California) and back in good weather. In ’84 upgraded to my Alajuela 38 “Lai Sien” and sailed it from LA to Guaymas (San Carlos}, Mexico, which has remained its home port ever since. Lived cruising life aboard with (now) wife, Terri, for 2 or 3 years beginning in ’91, and we have cruised it intermittently ever since. Regretfully neglected Paloma during all the years with the big boat, but I am now engaged in restoring it for lake sailing in Central Texas (Lake Travis) with young daughter (11) and grandkids in same age bracket. This is getting too long, but I will fill you in more later if you are interested.
I stumbled onto your weblog while looking for a working jib for Paloma, as I can’t find the original. I may order a used Cal 20 hank on jib from Minney’s in Newport Beach, CA at $185. Any thoughts?
I love boats, love your weblog and love the Alajuela 38 which for me is the ultimate cruising boat. Incidentally, there is a magnificent Alajuela 38 for sale in San Carlos owned by very close friends who lived aboard and sailed it for 10 years. Is that something your weblog readers would be interested in?
Malcolm Harris
Scott, This didn’t go thru your screen as an email reply to your email to me.
I found your blog after buying a ’70 Santana 21. I’ve had it out 2 times now in Pyramid Lake, NV. So far I love it and plan to fix it up a little.
Malcolm,
My boat came with 4 jib sails, maybe we can work something out. Let me know if you are still looking for one. My email is dr249 at hotmail.
I picked up a 69 Santana late last summer. I have sailed it on lake superior a few times, fum boat to sail. Does anyone know where to get a new main sail for a decent price.
Any idea where a guy may go to purchase a new keel for a Santana 21′?
I’m looking at buying one for the right price but the current owners lost the keel out sailing in a local reservoir. They’ve had a diver go look for it but it’s gone, couldn’t be found.
Mike,
Not sure where you would source one. I have the feeling it would be be a custom built item at more than the boat is worth.
However I might have a solution for you. My santana 21 is for sale. She is in ok shape with just a couple things needing to be done to here to be back on the water or you could just part her out and use the keel for your boat. She comes with two sails and a old 4hp johnson sailmaster outboard and trailer. I have the original cushions for her also though they need to be cleaned.
I am asking $1000 dollars as is for her. If I get around to finishing the projects on her I will be asking about 2200. Not sure if that is in your budget but to get a keel built for yours will cost more than that.
anyway.. if your interested give me a holler at 843-465-6555
Scott Carle
I have owned my Santana 21 for about 20 years and have recently started sailing again. On the first trip out the keel would not come all the way up, raised and lowered many times in the water, finally just put it on the trailer. Took it to the only guy in town and there they cleaned out the rust and dirt-dobbers. Works fine but I will definitely keep the article for the if/when major overhaul needs to take place.
thanks,
M.E.
Glad it was of some help for you.. They are nice boats.. easy to trailer, nimble on the water and seriously shoal draft for the ultimate in gunkholing.
Hello Scott, I live in Central NY and we looked at a Santana 21 1970 model for sale. It comes with a nice trailer and sails, rigging everything looks to be in ok condition except for below deck needs wok. Interesting the winch is located just before going below before the companion way. It is recessed with only the handle is exposed. All the pictures and drawings i see the winch for keel located below deck front of the trunk that holds the keel. Was this a design they only did for a short time? They are asking too much i think for the age and condition $2500 no motor included. Also the spot for the motor is to the right of the tiller and has nice self baling deep well cut out to mount it too flush with the transom. This design enables it to take a short shaft motor. The motor mount is also something i have not seen in other pictures or s21’s? We have a place north of Bar Harbor Maine where we would like to sail her and put her on a haul off with is on mudflats because of the 12 foot tides. It is bay area and very protected just wondering how the keel would put up with sitting on mud flats. the mud is very forgiving and not firm most of the boats are kept on the flats like this. I herd this boat can be beached and asking opinion if the keel and boat structure would put up with being on the mud flats twice every 24hrs? Love the blog and all the information! Thanks Scott
Scott,
My santana 21 is also a 70 and the winch is sitting on the forward edge of the keel trunk, also there is no
cutout for the outboard. I has a mount that is bolted to the transom.The stock drains are two small tubes at
cockpit floor level that run straight back through the transom.. Either it isn’t a shock santana 21
from 1970 or has been heavily owner modified. Either is possible. Wish you were closer 🙂 I would sell mine
for 1000 dollars with trailer and 4hp outboard 🙂 Mine is a project boat but the majority of it is cosmetic,
outboard needs to be overhauled. It was running when I quit using it but last time I cranked it it
didn’t want to run at full rpm.
Anyway…
they draw 18 inches with the keel up. With it up the keel probably extends 12 inches or less below the bottom
of the boat. So laying on the hard she will still heel over a little but it should be ok. What I would worry
about just letting her sit in soft mud is accelerated growth of stuff on the keel and rust. You will probably
need to paint and treat the keel as a regular annual maintenance. Keel is heavy cast iron so it is pretty
tough. We had our keel cable snap once and the keel fell in the water hard enough to shake the entire boat
badly. There was no damage to the keel itself or where the the keel is attached to the boat. I was pretty
impressed with how tough it was. If sitting in soft mud she will probably sit straight up and down. There
should be a link on my website with the other shock santana stuff to the manual shock would mail out that had
common owner repairs and projects as well as diagrams of the keel. Here is a link directly to the pdf http://www.scottcarle.com/wordpress/wp-content/uploads/2007/05/schock-santana-21
-manual.pdf
I just checked that manual and there is an alternative repair to it when the cable breaks to run the cable to a
winch at the rear of the keel case instead of the front like factory. The manual also has instructions for
tuning the rig and other stuff.
Hope it works out for you…
If you want a project santana and a long trip I have a great deal for you 🙂 Lots of scrubbing, sanding and
painting.
scott carle
Our Sea Scout Ship has taken position of a Santana 21. I can not find the VIN on the boat anywhere. She doesn’t even have any state registration numbers on it. The only numbers I can find is on the sail. That number is #284. Any help would be appreciated.
C.A.D. 1st Mate
I was wondering about the transom drains on a 73 santana 21. Maybe a stupid question but mine are just 1″ holes. What’s suppose to be in them? A one way valve or?
Yep that’s all that is there. I thought many a time it would be nice to put in some 2 inch drains at a minimum. There are no valves or anything but then none are needed as those holes should be above the waterline. If you took a lot of water into the cockpit I would consider the stock drains as a safety hazard. Two, 2 inch drains would be a much happier compromise. A couple 3 inch drains would be even better. I would not put a valve on them that could close. Maybe a one way flap at most. If you left the drains closed and didn’t check, the boat could fill with water and sink in a slip or crush it’s trailer if in the yard. After the cockpit filled it would then start filling the interior of the boat through the companionway opening.
hmm.. just had a thought. Mine is a 71 not a 73. Should be the same but I couldn’t guarantee. 🙂
Hi Scott, Happy New Year!
I just wanted to thank you for your info on the Santana 21 you have shared.
I’m sure you no longer have Comes Around Goes Around by this time and your willingness to keep your experiences with her online has helped me a lot to understand Soña (my 1973 S21 I bought in September 2020).
I put her in the water in October after futzing around with stuff for about a month in my driveway. I am new to sailing at 63 years old and totally immersed in all-things-sailing. She is in a slip on the Great Salt Lake and I’ve had her out a few times and it has been a blast!
She needs a few things but the keel seems ok and I am doing my best not to go broke $50 at a time and still ensure the safety of all onboard.
Best to you and yours.
Jim
lol.. sadly she is still sitting in yard on trailer but has deteriorated to the point that pretty much all the interior needs to be redone. Glad that the info I have on the site has been useful. I plan to keep it up there
Scott